Zoom
Create a virtual space for you to connect with students, colleagues, or others anytime from anywhere.
Zoom is a videoconferencing application that can be used to host meetings, course lectures and online synchronous activities.
In addition to being able to connect with attendees through video and audio, features such as a public and private chats, a collaborative whiteboard, screen, file and device sharing, polling and smaller breakout groups are available to enhance online lectures and presentations.
Features
Zoom offers industry standard features for videoconferencing that can also be integrated into the classroom for flexibility and accessibility.
Ways that you can use Zoom for the classroom
- Online lectures – Host lectures with up to 300 (or more) students without being restricted by location. Gallery view can also be enabled to see up to 49 participants’ video feeds at a time. Facilitate student collaborative group meetings through breakout rooms
- Exam support or invigilation – Create meetings for your students to monitor their progress during exam periods. Use Zoom’s built-in private chat to communicate with students needing assistance
- Office hours – Meet with students one-on-one without having to be present on campus
Key features and functions
- Online meetings with up to 300 participants by default
- Participants can join meetings on their computers through browser or through the Zoom desktop client
- Presenters can share their screen, applications, and files and grant participants control of presentation slides displayed
- Provides options to share a specific portion of your screen, an external device, or a collaborative whiteboard with participants
- Split attendees into teacher or self managed breakout rooms for collaborative smaller-scale discussions. A maximum of 100 breakout rooms can be created
- Ability to request remote control of participants’ computers during screen sharing
- Chat function allows students to engage publicly through text, or to contact instructors privately
- Sessions can be recorded and downloaded, and chats can be saved for viewing or archiving later
Arts ISIT Resources
Arts ISIT strives to present the most updated and accurate information for UBC Arts users. However, since vendors update their products regularly, this may cause users to have experiences that are different from what is presented on this page.
Setting up Zoom
UBC has a campus-wide license available to all faculty, TAs and staff that requires set-up through the university. For courses and events that require over 300 participants, a webinar mode setting can be applied by request.
Please note that registering on Zoom with your UBC email address is NOT equivalent to getting a UBC licensed Zoom account.
Request for a licensed account
- (TAs only) The course you intend to use Zoom with and have your instructor CC’d in the email message
- Send an email to the UBC IT Audiovisual Help Desk (av.helpdesk@ubc.ca) with the following information:
- The UBC email address that is associated with your Canvas account (check by going to Account > Settings in Canvas)
- Your faculty/school
- Your department
- Once your request has been approved, you will be sent an email with a link to activate your Zoom account.
- In the webpage that opens, click Sign up with a password. You may need to verify your date of birth for security reasons.
- Fill in the required info and click Continue to create your account.
- The Zoom application should automatically download for you, or you can download it at https://zoom.us/download. Once it has been downloaded, open it and follow the steps to install the application.
Meetings with over 300 participants are possible in webinar mode, but some features will be limited. To have the webinar mode applied, send a request to av.helpdesk@ubc.ca and include the following information:
- detailed reason
- event date
- time
- number of participants
Running Zoom classes
For the Canvas-Zoom integration to be successful, your default/primary email on Canvas must be the same as your UBC Zoom email address. To associate your UBC-licensed Zoom account with Canvas, follow the steps below:
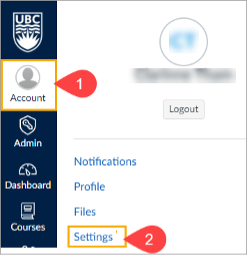
- From the Canvas global navigation menu, click Account [1]
- Click Settings [2]

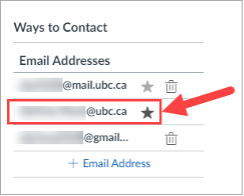
- Locate Ways to Contact. Under Email Addresses, find your UBC email address that you used to request a UBC Zoom account
As a meeting host, you can broadcast your microphone audio to all participants in breakout rooms. This setting can be useful for exam support, as well for managing participants in breakout rooms during class.
To enable the feature:
- Log into ubc.zoom.us
- Click Settings on the left side of the page
- Click In Meeting (Advanced)
- Under the Breakout room section, check Broadcast voice to breakout rooms

To use the feature in a meeting:
- In your meeting controls, click Breakout Rooms
- Click Broadcast
- Click Broadcast Voice
- Unmute your microphone to begin broadcasting your audio

Zoom provides automated live transcription for all licensed accounts. As a host, you can enable this setting so that participants can view the transcript as needed.
There are also a few limitations to consider, covered in the guide linked below. For best results, we recommend using an external microphone and speaking slowly.
By default, Zoom allows hosts and co-hosts to broadcast a message to participants in the waiting room. It is now possible to change the settings to allow for two-way communication in the chat between the hosts/co-hosts, and participants.
Note: This feature requires that all users use Zoom version 5.8.0 or higher.
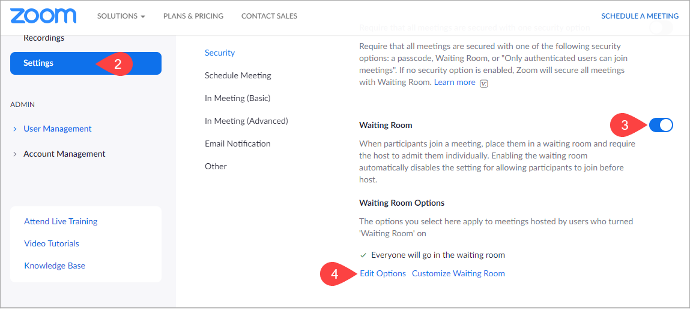
To enable this feature:
- Log into zoom.us
- Click Settings
- Toggle on Waiting Room
- Click Edit Options
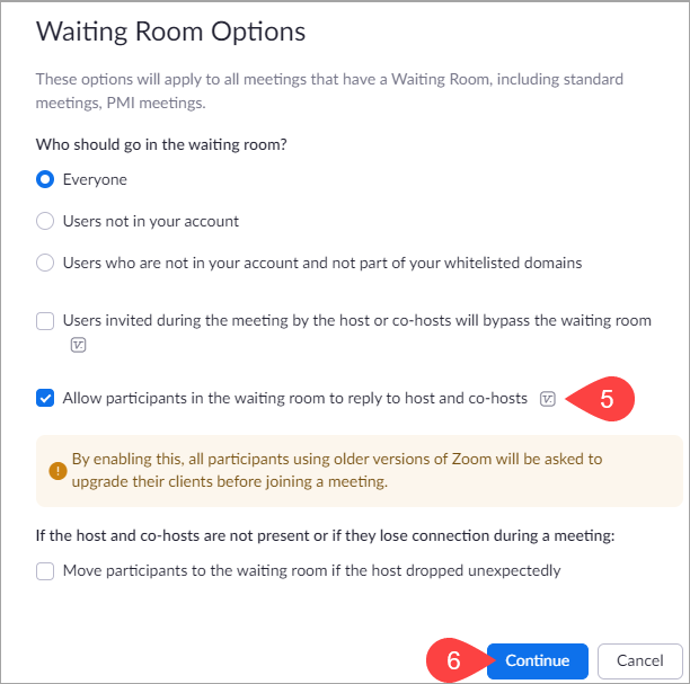
- Checkmark Allow participants in the waiting room to reply to host and co-host
- Click Continue
Managing participants
Students in the Faculty of Arts do not receive UBC-licensed Zoom accounts. Requiring students to sign up for a non-UBC Zoom account does not comply with FIPPA standards as non-UBC Zoom licenses store data on US servers. Therefore, students must be allowed to enter an alias when using Zoom.
UBC is not able to track these aliases and find out which students are using them. In the case that students using aliases are chatting in the Zoom session regarding unrelated topics, a good solution would be to turn off the chat feature using the instructions below.
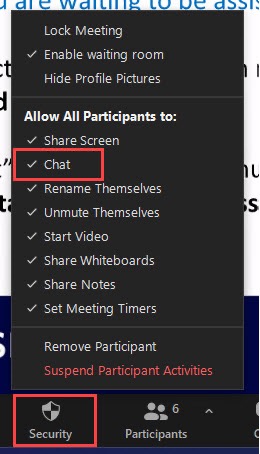
If you want students to not be able to chat, you can turn off this feature:
- Click Security in the Zoom tool bar
- Uncheck Chat
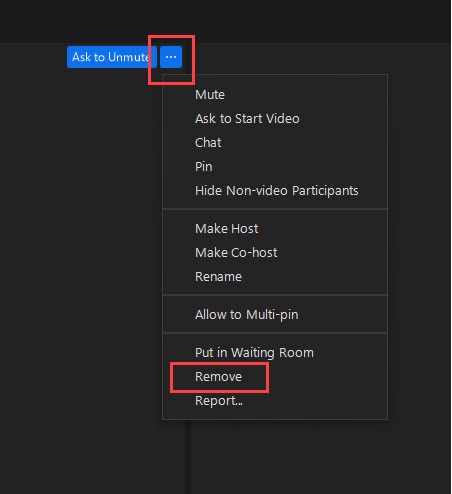
If someone in your Zoom session is using a name that you do not recognize as a part of your class, it is important to confirm that the participant is not a student using an alias. If the participant is not a student in your class, you can remove them from the session.
- Hover over the participant's icon
- Click the three dots
- Click Remove
Featured News
Additional Resources
Consultations
If you would like further support on Zoom, please connect with us to learn more about the tool and its capabilities.