Using LockDown Browser and Zoom on two separate devices is a good way to invigilate remote online exams.
How does it work?
Zoom, a video conferencing application, can be used to monitor students while they take their online Canvas exams via LockDown Browser, a specialized web browser that prevents students from copying external content, accessing applications and visiting other websites for the duration of the exam.
Note: You may use Zoom to monitor students and discourage them from cheating, but please note that the tool does not prevent cheating.
Creating an exam with LockDown Browser and Zoom using TWO devices
- Requires instructor to have a UBC licensed Zoom account to host the session.
- Students use two devices, one for writing the Canvas exam with Lockdown browser and a secondary device for Zoom that shows the student workspace (i.e., students write the Canvas Quiz on a computer and have Zoom open on their phone).
Things to Consider
Exam practice run: To ensure students get familiar with LockDown Browser and resolve issues in advance, have your students enroll in the Arts ISIT Exam Practice Run course on Canvas. The course includes practice quizzes for students to identify and resolve potential issues. This site also includes a comprehensive student guide, troubleshooting tips and support information. Instructors are also encouraged to self-enroll to review the contents.
Breakout rooms: Breakout rooms will need to be created for courses with 25+ students, as Gallery View only displays up to 25 video feeds (or 49 depending on screen resolution) per page. Note that there is a maximum of 100 breakout rooms that can be created per session.
Note: For large classes of 300+ students, contact av.helpdesk@ubc.ca and request to activate “Large Meeting Add-On” for your Zoom account.
Chat functions differently in breakout rooms. If private chat is disabled, students can still send a chat message that is visible to everyone in the breakout room – including the invigilator.
Invigilator setup: Each breakout room should have one invigilator. The invigilators can be TAs or instructors and they should be given host/co-host access.
Invigilator communication: Hosts and co-hosts are recommended to use an external communication application such as Microsoft Teams, Zoom chat through the desktop client app, etc to interact amongst themselves.
Staggering start times: For courses that have a large number of students, it is recommended to stagger the start times of the exam by at least five minutes apart per group of students. This will help with performance and reduce load issues of the exam in Canvas. Please contact us for assistance on how to bulk assign your students for your upcoming exam.
Checklist for running the exam in Zoom
- Adjust the Canvas Quiz availability and duration to accommodate the time students need, to join the Zoom session and complete their set-up.
Tip: Give yourself sufficient time to set up the session, allow participants in, and address any technical questions your students may have. - Assign the invigilators as co-hosts (or alternative hosts if they have a registered UBC Zoom account). This will serve as a backup plan in case the host has issues with internet connectivity and will allow them to help with breakout rooms.
- Click on Manage Participants in the meeting controls at the bottom of the Zoom window
- Hover over the name of the participant who is going to be a co-host, and choose More
- Click Make Co-Host
- Disable chatting class-wide.
- Click the Chat icon at the bottom of the Zoom desktop application
- Click the three dots > Host only
- Allow participants from the waiting room to join the session.
- Lock the meeting once all participants have joined through the Security icon.
- Create and assign participants to breakout rooms (if preferred).
- Select “Gallery View” by clicking the View button on top right corner of your Zoom window.
FAQs
It is recommended that you provide a good pedagogical rationale for why you have chosen a particular tool in the course and communicate this to your students. This allows students to make a choice if they wish to continue the course. Learn more here: Principles for Remote Invigilation.
Example Paragraph for Syllabus: This course will use a combination of Zoom and LockDown Browser to monitor your Midterm and Final exams. This tool was chosen in order to address accreditation requirements and maintain academic integrity for tracking academic progress of individual students. For more information, please refer to the UBC Lockdown Browser Student Guide. If you require accommodations for accessibility needs or technical/connectivity issues, please contact the Centre for Accessibility or your Enrolment Services Advisor.
If you wish to record the session, you must store Zoom session recordings on a cloud. Zoom will only record the main session and not the breakout rooms.
The following Zoom settings are recommended when recording to the cloud so that the gallery view is more prominent:
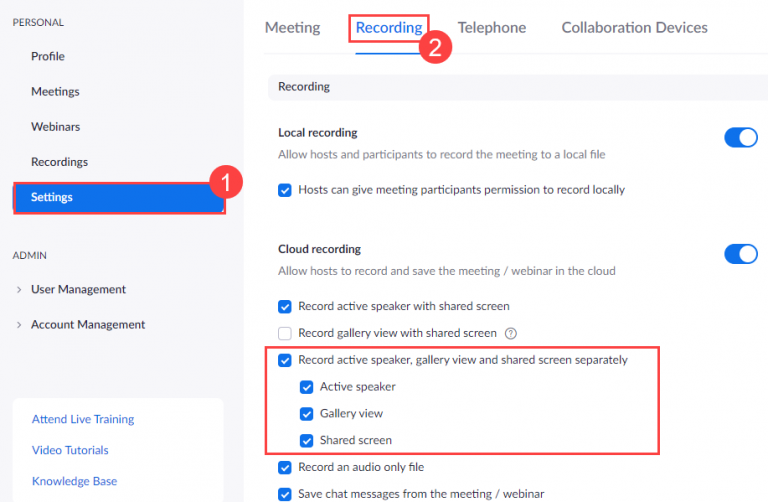
- Go to zoom.us to log in to your UBC Zoom account and click Settings from the left menu
- Choose Recordings from the top menu
- Under Cloud Recordings, check mark Record active speaker, gallery view and shared screen separately
Note: If you wish to record the exam and you have more than 25 students (or 49 depending on screen resolution), consider creating multiple Zoom sessions. You will need co-teachers or TAs to schedule the other Zoom meetings and invite you as co-host (UBC licensed Zoom accounts required).
In order for users to be added to another person's meetings as an alternative host or to create Zoom meetings for office hours, lectures, exams, and other uses, they will need a UBC licensed Zoom account.
To set up a UBC licensed Zoom account, please send an email to av.helpdesk@ubc.ca with the following information:
- UBC email address
- Faculty / School / Department
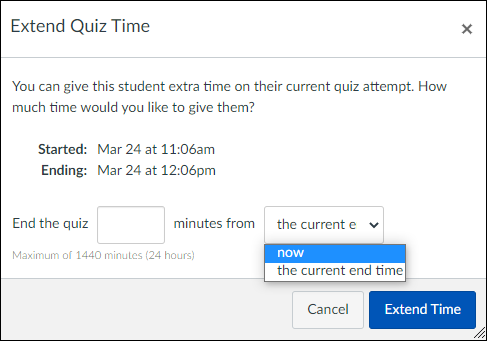
You may provide time extensions for students in Canvas by following these steps:
- Go to your course on Canvas.
- Go to Assignments.
- Click on the quiz.
- Click Moderate this Quiz from the right sidebar.

- Find the student that you would like to increase the exam time for. When they are attempting a quiz, a blue clock icon will appear next to the timer.
Click the blue clock icon.
- Enter the extra time that you would like to grant the student in minutes.
- Select if you would like to extend their time immediately after clicking Save, or if you would like to extend their current end time.
- Click Extend Time.
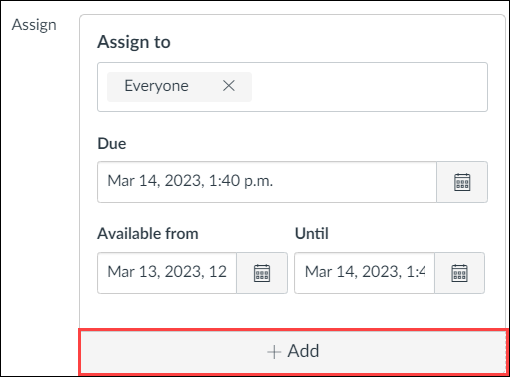
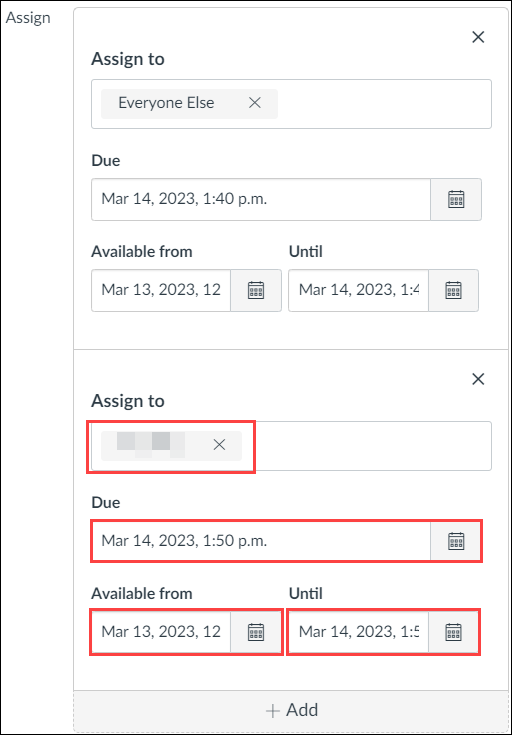
- Navigate back to the quiz page.
- Click the Edit button on the top right.
- Scroll down and find the Assign box.
- Click +Add on the bottom of the box.
- Type in the student's name in the Assign to bar and click on their name.
- Adjust the Due and Until date for them to reflect the extra time given.
- Note: If there already exists a separate Assign box for the student, there is no need to create a new one; you will just have to adjust the Due and Until date for them.
- Click Save.


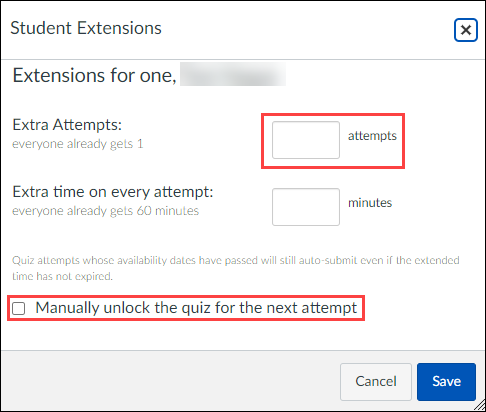
You may increase the attempts allowed for a student(s) in Canvas by following these steps:
- Go to your course on Canvas.
- Go to Assignments.
- Click on the quiz.
- Click Moderate this Quiz from the right sidebar.
- Find the student that you would like to grant the extra attempt to. Click the pencil icon on the right-side hand of the screen.
- Enter the number of extra attempts that you would like to grant the student.
- Select if you would like to manually unlock the quiz for the next attempt.
- Click Save.

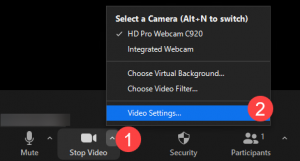
If your screen resolution supports it, Zoom gallery view can display 49 students instead of the standard 25. To enable the setting:
- Click on the arrow beside the video icon on your Zoom menu panel
- Choose Video Settings...
- Scroll down the video settings and choose 49 participants under Maximum participants displayed per screen in Gallery View
Two zoom sessions at the same time can be created per account. The first meeting can be started on the Zoom Desktop App, but the second session must start from a browser. In the browser:
- Go to join.zoom.us
- Enter the meeting ID
- Click Join
- Note: Your computer may prevent you from using a single webcam in multiple meetings.