Faculty and Staff Mail (FASmail) accounts in the Faculty of Arts are migrating to the Microsoft Exchange Online server. Learn what you need to do to prepare.
UBC IT is migrating all faculty and staff email services (FASmail) from being hosted on-premises to the cloud platform Microsoft Exchange Online (Microsoft 365). As part of the UBC-wide migration, all FASmail accounts in the Faculty of Arts will be migrated to the cloud server by the end of March 2025.
Email accounts will be migrated gradually by unit. As an Arts employee—whether you are a faculty member, staff, TA, or student staff—you’ll need to follow minor action items before and after your account is migrated.
What do I need to do?
2) Follow the action items on this page: As a FASmail user, there are minor steps you’ll need to follow before and after your unit's migration date. Please see the Do Now and Do on your migration date sections below for step-by-step instructions.
New username for logging in
After your account has been migrated, you will no longer use your CWL username to log in. Ensure that you log in with the credentials below:
- Username: firstname.lastname@ubc.ca (instead of your CWL username)
- Password: CWL password
For FASmail users, the most notable change is the new process for logging in with Webmail.
After your account has been migrated, you can access FASmail by visiting https://outlook.office.com (instead of https://mail.ubc.ca) and logging in with the credentials below:
- Username: firstname.lastname@ubc.ca (instead of your CWL username)
- Password: CWL password
Aside from this change, your end experience with FASmail and its key functionalities will remain the same.
Since all Arts employees have a FASmail account, the migration applies to everyone employed at the Faculty of Arts including:
- Faculty members
- Staff members
- Student employees (including teaching assistants)
Your account will be migrated at the same time as the rest of your unit. See the migration timeline below to find your unit's migration date.
You will also receive email reminders from UBC IT closer to your migration date.
As the current email server reaches its end-of-life, FASmail will be migrated to the new Microsoft 365 cloud server. In the future, the migration would also enable UBC IT to integrate cloud services and collaboration tools that are available from Microsoft.
Additionally, the mailbox storage quota will increase from 8GB to 50GB per mailbox.
Migration will take place overnight to minimize service disruptions. There will be no interruptions to emails received during the migration, and you will not miss any incoming emails.
Arts ISIT staff have also conducted a pilot of the migration and noticed no significant issues.
Do now
Actions required before the migration
- Delete old emails: We recommend cleaning up your mailbox by deleting old emails that you do not need from your inbox. Once all old emails are deleted, empty your deleted folder and close the email client.
- Ensure your computer is up to date: Install any necessary software updates to ensure that your operating system is up to date. Click the links below to launch the updates on your computer.
Do on your migration date
Actions required after the migration
Note: To find your unit’s migration date, refer to the migration timeline in the next section.
To access your FASmail account after the migration, you will need to reconfigure FASmail on e-mail clients including Outlook, Apple Mail, and mobile devices. You may need to sign in again, re-add any shared mailboxes, and other additional steps.
Follow the step-by-step instructions below according to your device and email app.
Log in
Outlook users will be prompted to sign in again with the credentials below. MFA/Duo authentication will be required.
- Username: firstname.lastname@ubc.ca
- Password: Your CWL password
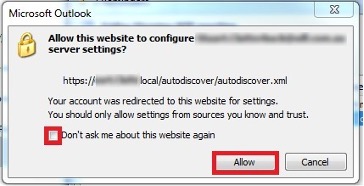
When prompted, allow Outlook to configure your settings and check “Don’t ask me about this website again."

Set up shared mailboxes
If you have access to any departmental generic mailboxes, they may not get automatically added to your Outlook. To add them again on Outlook:
- Go to Files > Account Settings.


- In the E-mail tab, select the mailbox and click Change.


- Click More Settings.


- Select the Advanced tab and click Add.


- Type the display name or generic email address you would like to add/open.


- Once you have finished searching for your mailbox, click Ok > Apply > Ok > Next > Finish and then Close.
- Restart Outlook.
Log in
Outlook users on Mac will be prompted to sign in again with the credentials below. MFA/Duo authentication will be required.
- Username: firstname.lastname@ubc.ca
- Password: Your CWL password
When prompted, allow Outlook to configure your settings and check “Always use my response for this server.”
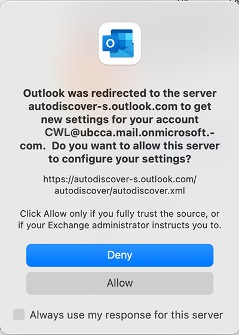

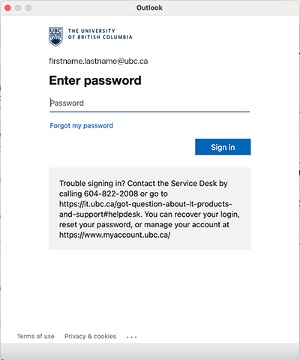
You’ll be shown a Microsoft sign in page. Use firstname.lastname@ubc.ca as the username.


Enter your CWL password and click Sign in.

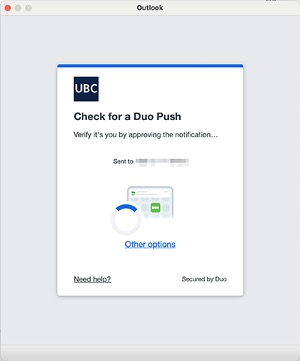
Duo will appear for multi factor authentication. Follow the usual Duo prompts to verify your log in.

Set up shared mailboxes
If you have access to any departmental generic mailboxes, they may not get automatically added to your Outlook. To add them again on Outlook:
- In the Tools menu, click Accounts.


- Click Advanced.


- Click the Delegates tab at the top. Under "Open these additional mailboxes", click the + symbol.


- Search for the mailbox you wish to add, select it, and click Add.


- The additional mailbox should now appear in the list under "Open these additional mailboxes." Click OK and exit the account window. Your newly added mailbox will now appear in the list of accounts in the left pane.


Note: If the mailbox does not appear, restart Outlook.
Remove and re-add your email account
- On the top left corner, click Mail > Accounts.


- Click your UBC email account.


- Click Delete Account.


- When asked to confirm if you want to delete your FASmail account, click OK.


- Close your Internet Accounts settings screen then quit and reopen your Mail app.
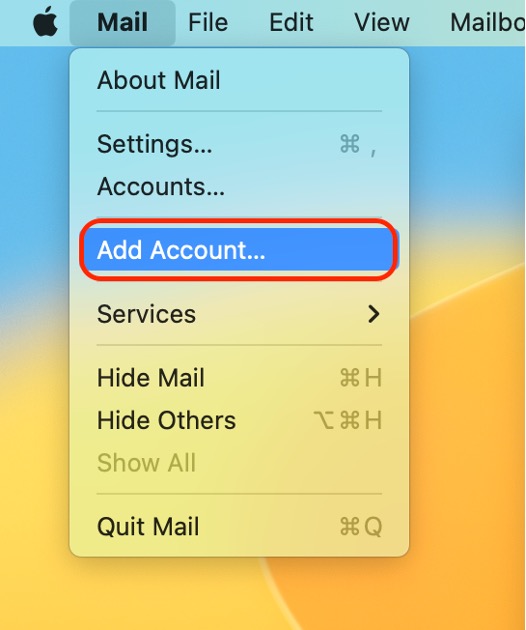
- On the top left of your screen, click Mail > Add Account.

- You will be prompted to Choose a Mail account provider. Select Microsoft Exchange and click Continue.


- Enter your name and email address and click Sign In.


- When prompted to sign in to your Exchange account using Microsoft, click Sign In.


- You will be redirected to a Microsoft Single Sign On login page. If you used your firstname.lastname@ubc.ca in the Step 8, you may be prompted for your password instead, as seen in Step 11. Otherwise, ensure you are using firstname.lastname@ubc.ca as your sign in email.


- Click Next. On the Enter password field, type in your CWL password.


- Click Sign In. When prompted for multi-factor authentication via Duo, follow the instructions on your screen to verify your identity.


- Once authenticated, confirm the services you'd like to sync, and click Done.
Your MacOS Mail app is now set up for use. Please note that it may take some time to download your existing emails the first time you set up your account.
- After the migration, you will be prompted with a password incorrect message when accessing your FASmail on the iOS Mail app. Click Cancel and if prompted again, simply keep clicking Cancel.


- Exit your Mail app.
- Go to Settings on your iPhone or iPad.
- Scroll to the bottom, and click on Apps.
- If you're using iOS 17 or older, skip to Step 5.
- Go to Mail > Mail Accounts.
- If you're using iOS 17 or older, click Accounts.
- Select your FASmail account.
- You may have labelled your FASmail account as "UBC FASmail", "UBC Exchange", etc. Select the account you have associated with your FASmail mailbox.
- On the bottom of the screen, click Delete Account.


- Click Delete from My iPhone on the Delete Account prompt.


- Afterwards, you can re-add your FASmail account.
- If you have Stolen Device Protection enabled on your iOS device, a security delay will be required if you're making changes affects your device's security settings from an unfamiliar location (e.g. away from your home location).


- Clicking on Start Security Delay will start a 1 hour timer before you can make the changes. Make sure you proceed to add your FASmail mailbox once the timer is up; otherwise, you will need to run it again.
- If your iOS device's passcode is older than 730 days (2 years), you will be prompted to change your passcode after setting up your FASmail account.


- Click Change Passcode and ensure you set a new passcode before you can use your FASmail mailbox on your iOS device.
Important
DO NOT proceed with the setup instructions above unless you are able to commit the new required 5-character/digit passcode to memory. - Go to Settings > Apps (If using IOS 17 or order, go to Mail > Mail Accounts). Click Add Account and select Microsoft Exchange.


- In the Exchange account information screen, enter the following details:
- In the Email field, type in your FASmail email address (i.e., firstname.lastname@ubc.ca).
- In the Description field, type in UBC FASmail.


- On the "Sign in to your 'ubc.ca' Exchange account using Microsoft?" prompt, select Sign In.


- On the next prompt "'Settings' Wants to Use "microsoftonline.com" to Sign In", click Continue.


- You will be redirected to a Microsoft Single Sign On login page. Ensure you are using your firstname.lastname@ubc.ca as your sign in email.

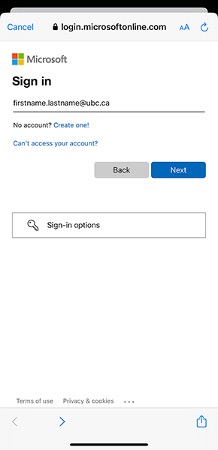
- Click Next.
- On the Enter password field, type in your CWL password manually.


- Click Sign in. When prompted for multi-factor authentication via Duo, follow the instructions on your screen to verify your identity.


- You will now be asked which apps you would like to synchronize between your device and FASmail. Allow all apps.


- Click Save. Your iOS device is now configured for UBC FASmail.
After migration, your mailboxes will no longer be synced when accessing your FASmail on the Gmail app.
You will first need to remove FASmail from the Gmail app and then re-add it as a new account.
- In the Gmail app, click the profile or Microsoft Exchange icon on the top right.


- At the bottom of your screen, click Manage accounts on this device.


- Click your UBC FASmail address.


- Click Remove account.

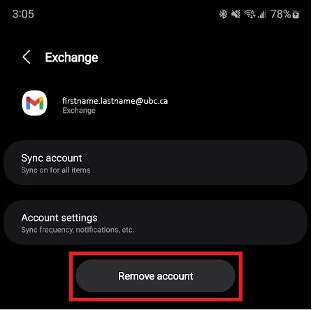
- A confirmation prompt will appear. Click Remove account again.


- Under Manage accounts, confirm your mailbox is no longer listed. Click Add account to re-add your FASmail account.


- Open the Gmail app and select the profile or Microsoft Exchange icon at the top right.


- Click Add another account.


- Click Exchange and Office 365.


- Enter your email address and click Next.


- You will be redirected to our Microsoft M365 SingleSignOn logon page. Enter your CWL password and click Sign in.


- When prompted for multi-factor authentication via Duo, follow the instructions on your screen to verify your identity.

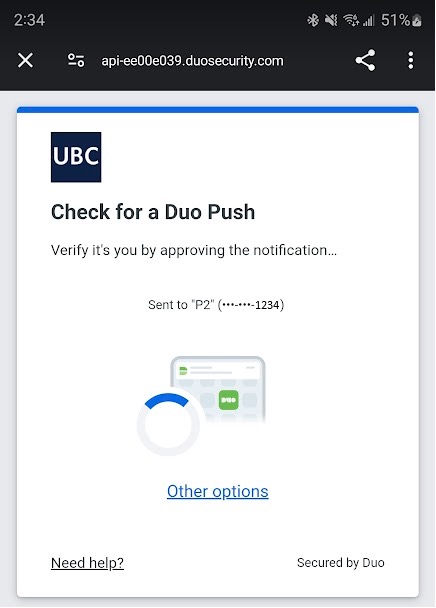


- Once authenticated, your Android device is now configured for use with UBC FASmail.


FASmail can be accessed on any web browser by visiting https://outlook.office.com.
Use the following credentials to log in to FASmail:
• Username: firstname.lastname@ubc.ca
• Password: CWL password
'cwl@mail.ubc.ca' addresses
Migration schedule
Refer to the timeline below to find your unit’s migration date.
Note: If you work with a centre, institute, or another type of subunit, your migration date is the same as the rest of your home unit listed below (e.g., Belkin Art Gallery is included with AHVA, FNIS is included with CIS, etc.)
February 11, 2025
- Dean’s Office
February 18, 2025
- Economics
- Geography
- Psychology
- Arts Academic Advising
- Arts Co-op
- School of Information (iSchool)
- First Year Program
February 25, 2025
- Ancient Mediterranean and Near Eastern Studies
- Political Science
- Creative Writing
- Philosophy
- Institute for Critical Indigenous Studies (CIS)
- Humanities 101
March 4, 2025
- English
- French, Hispanic and Italian Studies
- Central, Eastern and Northern European Studies (CENES)
- Gender, Race, Sexuality and Social Justice (GRSJ)
- History
March 11, 2025
- Chan Centre for the Performing Arts
- Anthropology
- Sociology
- BC Studies
- Canadian Literature
- Arts Development and Alumni Engagement (DAE)
March 18, 2025
- Art History, Visual Art and Theory (Includes Art Gallery)
- Theatre and Film
- School of Journalism, Writing and Media
- School of Music
March 25, 2025
- Asian Studies
- School of Public Policy and Global Affairs (SPPGA)
- Social Work
- Linguistics
- Asian Canadian and Asian Migration Studies (ACAM)
- Cognitive Systems

