“Providing students with flexibility, so that no one falls behind or gets left behind.”
 “Providing students with flexibility, so that no one falls behind or gets left behind.”
–Afsaneh Sharif, Senior Project Manager (CTLT)
Accessibility and Why it Matters
What is Accessibility?
Accessibility in education means that course materials, content delivery and learning activities are accessible for students with the widest possible range of abilities, operating within the widest possible range of environments, conditions, and circumstances. [1]
This guide will provide best practices and suggestions to create a classroom environment that is accessible for all your students.
Why does it matter?
Statistics Canada estimates that one in every five Canadians over the age of 15 has a disability. At UBC, a quarter of undergraduate students report having at least one disability but only 33% of these students have registered with and are getting support from the Center for Accessibility. Only 47% report feeling a sense of belonging at UBC.
Universal Design for Learning (UDL)
UDL is an educational framework based on scientific research that guides the development of accessible and effective learning spaces for all students to have equal opportunities to succeed in.
There are three UDL principles used to break down barriers to learning for inclusive instruction: multiple means of Representation, Action and Expression, and Engagement.
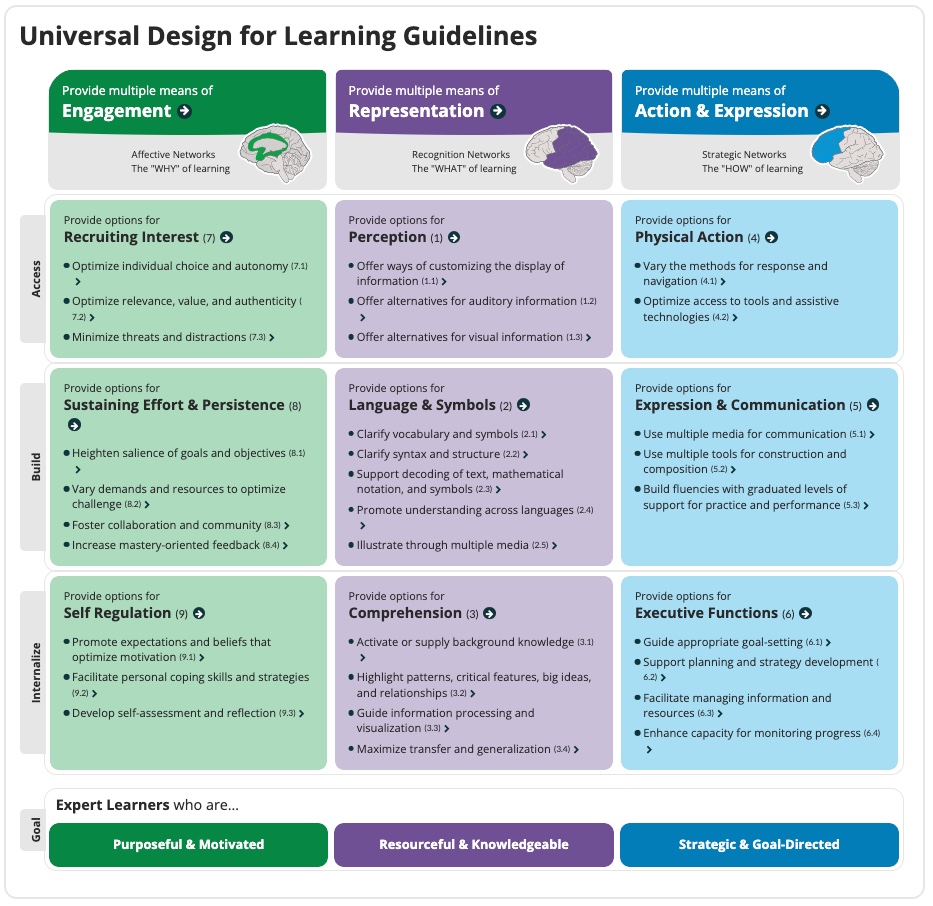
In short, there are no one-size-fits-all means of representation, action and expression, and engagement.
How can we offer information in different formats?
For any non-text content (e.g., Images) that you plan to use in your course materials, ask yourself what is its purpose – “Is it for decoration? Or is it delivering a message”?
Although usually not seen on or around the images, alternative texts provide a textual alternative that helps users with visual disabilities understand the content and function of each image. This makes a huge difference for visually impaired students while they use assistive technology such as screen readers.
Audio/Video transcriptions, captions, and even just a page with the information covered in the media can be hugely helpful for online learning, serving as an alternative for anyone who has difficulties accessing the media content.
They can also be beneficial to ESL students who struggle with pronunciation or students who experience low-bandwidth connections.
Using title and section headings helps to prioritize information and emphasize specific content. Designing your course in this predictable and consistent manner makes it easier for students to digest and comprehend the material.
Assistive technologies can quickly navigate through correctly identified headings, and convey the course’s structure and information clearly to your students who may be visually impaired.
Descriptive hyperlinks tell you exactly which website or file you will be directed to after clicking on the link. Screen readers can read descriptive hyperlinks as written text, allowing the visually impaired to know exactly where the link will take them.
If a link is ever broken, one can also simply look for the webpage using a search engine such as Google. Descriptive hyperlinks avoid phrases such as “click here”, “read more”, etc. Accessible hyperlinks look like this:
- Please visit Centre for Accessibility at UBC for more information.

“[Consider] what your slides look like to colour blind students… what problems can arise, what we can use to avoid these issues [and] what it’s like to communicate with members of the deaf community.”
–Strang Burton, Associate Professor of Teaching (LING)
Arts Faculty’s Tips on Accessibility
Colour-blind people are unable to clearly distinguish between different colours, seeing, instead, colours in a limited range of hues. “How might your content appear to colour blind students? What problems might arise for them when viewing the content?” These are important questions to ask when you design your course.
While there is no official optimal font size, the font size should never affect the readability of the text. A good size would be 12pt for body text, no smaller than 9pt.
Although we may not be able to accommodate all types of colour blindness, we can consider the three most common forms.
- Deuteranopia/Deuteranomaly - ‘Green’ colour blindness
- Tritanopia/Tritanomaly - Blue-yellow colour blindness
- Rod/Cone Monochromacy – Total colour blindness (everything looks grey)
Proper colour contrast will make it easier for colour-blind students to identify and understand the image or text in your course content. A great way to check if your content is colour blind friendly is to use this COBLIS simulator which lets you view your content through their colour-blind lens.
- Do not rely on JUST colour-coding to differentiate or emphasize your content.
- Add icons, shapes, patterns, textures, font differences, hue differences and descriptions to supplement important information.
- Use a colour-blind friendly palette. Avoid using green and certain colour combinations such as Blue + Purple or Blue + Gray.
- Keep things simple. Adopt a minimalistic design to help avoid unnecessary confusion.
Communicating with hard of hearing people
Ever needed a professional interpreter for your class or meeting but had no idea where to look? You can book an ASL interpreter with UBC Student Services. A professional interpreter can be arranged for in-person, virtual and phone meetings.
However, due to the high demand for these services, you might want to consider opting for a quick phone meeting (if appropriate), which may be more convenient and easier to schedule.
Strang's tip as a non-signing person
Look at the person you are having a conversation with, NOT at the interpreter!
It can be intuitive to direct your attention to the interpreter since you are hearing their voice. Instead, direct your gaze at the deaf or hard of hearing person. It may be helpful to have the interpreter stand behind you.
Additionally, UBC also provides real-time and media captioning services to make your work more accessible. If you require any of these services mentioned, please feel free to submit a Captioning and Sign Language Interpreting Request at least 2 weeks prior to the meeting (for faculty or staff only).
Teaching and Learning Tools
Here are some teaching and learning tools supported by Arts ISIT you can utilize to make your courses and teaching more accessible to students.
Accessibility Checker in Canvas
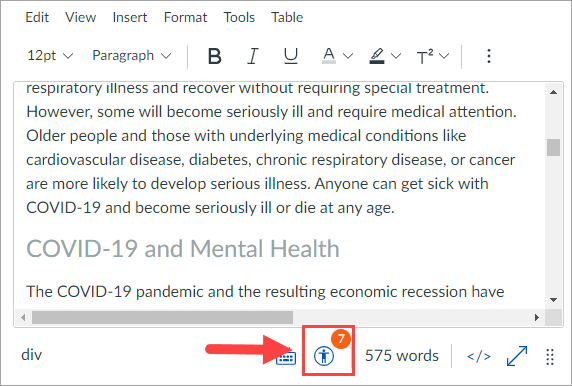
The Accessibility Checker, found in the Rich Content Editor in Canvas, allows you to design course content while conveniently considering accessibility. Note that this tool is limited to the content within the Rich Content Editor.
- If there are any accessibility issues, you will see an indicator on the Accessibility Checker (person in the circle at the bottom of the rich content editor). Click on the Accessibility Checker to view the issues. A sidebar will appear on the right side of the page.
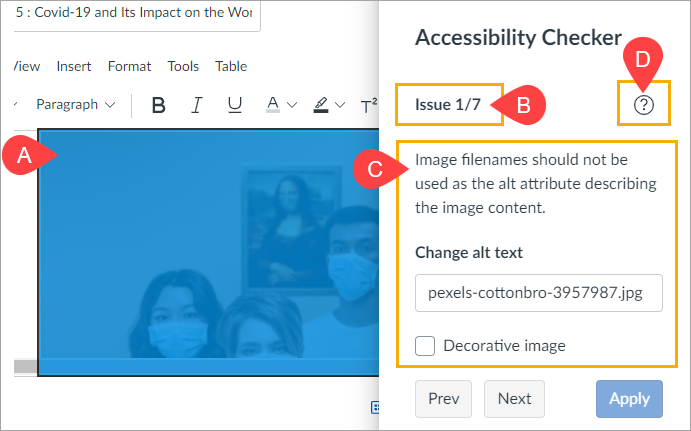
- If an issue is detected, the affected area will become highlighted [A]. The sidebar displays the number of accessibility issues [B], describes the accessibility attribute, explains the error, and provides a task to complete [C].[Optional] Click the "?" icon to learn more about the accessibility attribute [D].
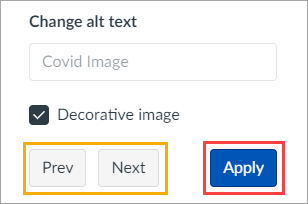
- You can use the Previous/Next buttons to view all issues. After making your changes, click Apply.
- When all issues have been fixed, or if no issues are detected in the Rich Content Editor, the sidebar will indicate that no issues exist.
Enabling Zoom Live Transcriptions
Live Transcription provides computer-generated speech to text transcripts in your Zoom Meetings. This feature is only available in the main session (i.e., not in breakout rooms), and must be enabled by the host at the beginning of the meeting in order for participants to view captions.
The Live Transcription feature only needs to be enabled in your Zoom account once. This option will be permanently available to turn on during your meetings once the following steps have been completed:
- Sign in to your Zoom account on ubc.zoom.us.
- Click Settings [1] in the menu on the left side of the page
- Click on the Meeting tab [2] > Click In Meeting (Advanced) [3].
- Locate Closed Captioning and toggle the button on the right. It should become blue.
- Check the box for ‘Allow live transcription service to transcribe meeting automatically '. [Optional but recommended] Check the box for ‘Allow viewing of full transcript in the in-meeting side panel’. Enabling this option will allow students to view the full transcript in a side panel and save captions.
- Click Save.
Please ensure that Live Transcription has been enabled prior to your meeting.
- Once you have started your meeting, click Live Transcript at the bottom of the screen. If you are unable to see the button, click More > Live Transcript.
- Click Enable Auto-Transcription. This button will turn blue, indicating that live transcription has begun.
- The live transcription will appear along the bottom of the screen:
Limitations
The accuracy of Zoom’s live transcription feature can be impacted by several factors such as background noise, clarity of the speaker’s voice and so on. Because of these limitations, you may also want to consider a manual captioner who may be able to guarantee a specific accuracy.
Ordering Captions for Kaltura Videos
Automated captions can be ordered in Kaltura on Canvas. You can order captions for a single video or for multiple videos with quick turnaround times. 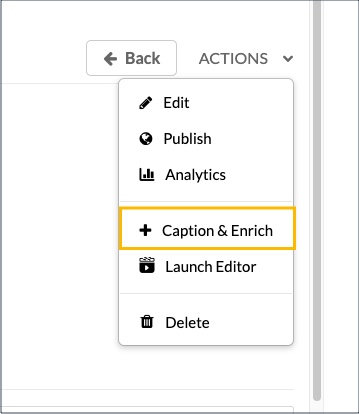
Kaltura also has an intuitive caption editing interface where you can make any necessary changes to the transcript.
CLAS: Collaborative Learning Annotation System
Collaborative Learning Annotation System (CLAS) integrates video playback, time-based annotation and commenting, recording and media management, all into one application.
Use CLAS to engage your students through collaborative annotation on images, videos, and PDFs. Students and instructors can use shapes and cues to direct the user's attention to important features. You can easily look through all the comments left by the class, and identify the annotation that corresponds with the highlighted comment.
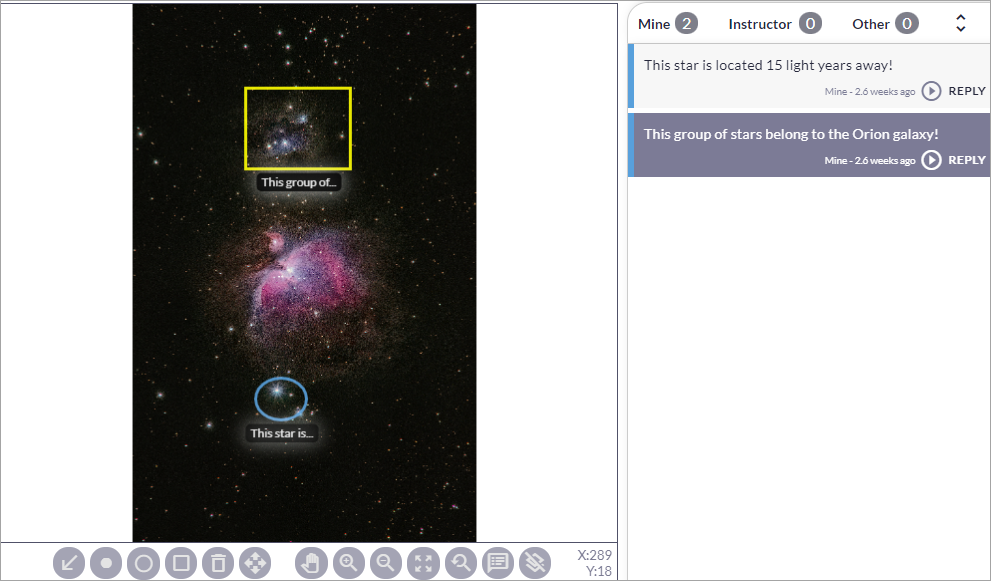
CLAS also can be used to make time-specific annotations on videos and audio.
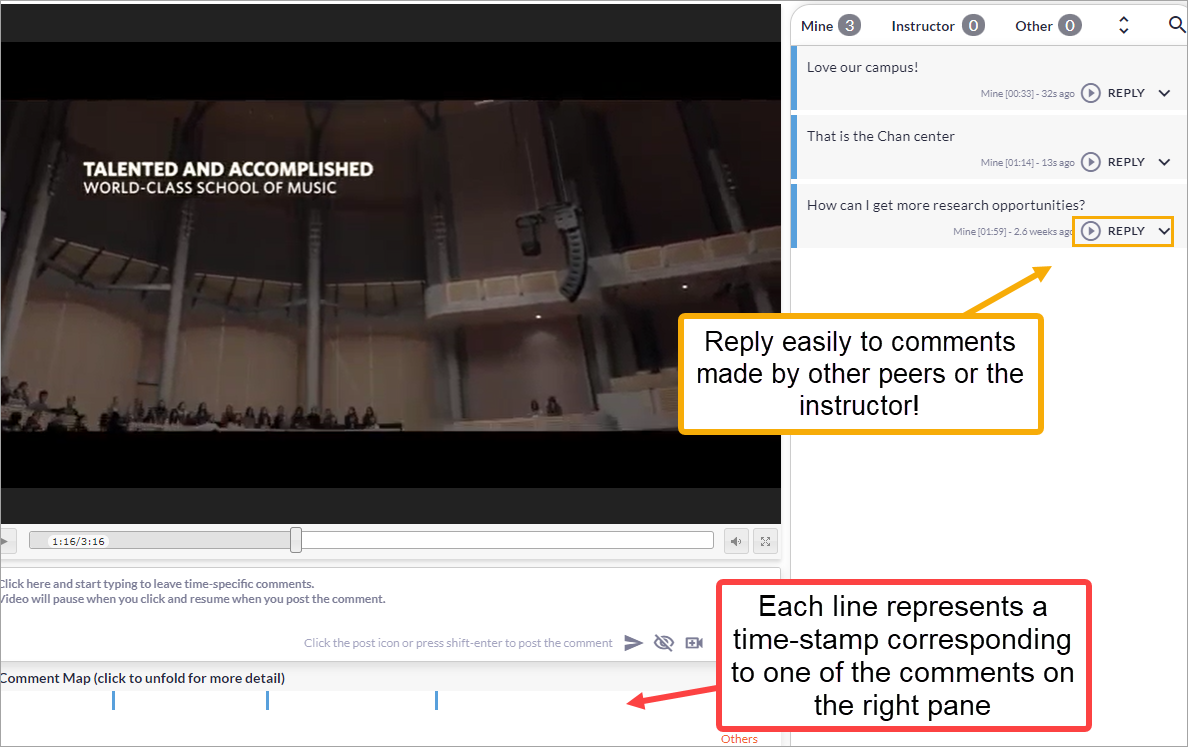
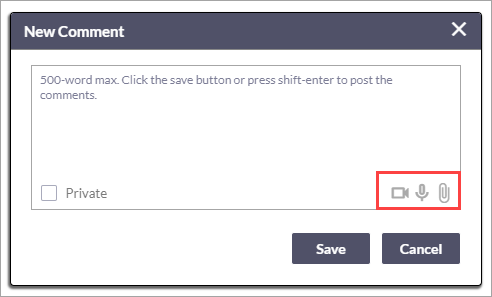
CLAS provides students flexibility to choose what form of commenting works best for them. They can leave comments by creating a video, an audio clip, attaching a file or leaving a text response!
Accessibility Checker in Microsoft Tools
Before sharing your slides, document or spreadsheet, run the Accessibility Checker to make sure your Microsoft Office content is easy to read and edit for everyone.
This feature is available in most Microsoft Office applications (Microsoft PowerPoint, Microsoft Word, Microsoft Excel, and Microsoft Outlook).
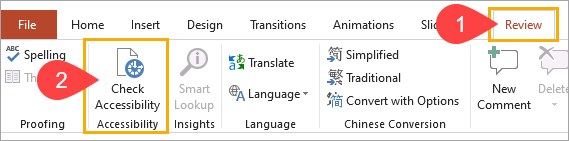
- Click the Review tab at the top. (When using Outlook, the Review tab only appears when you are writing or replying to emails.)
- Click Check Accessibility.
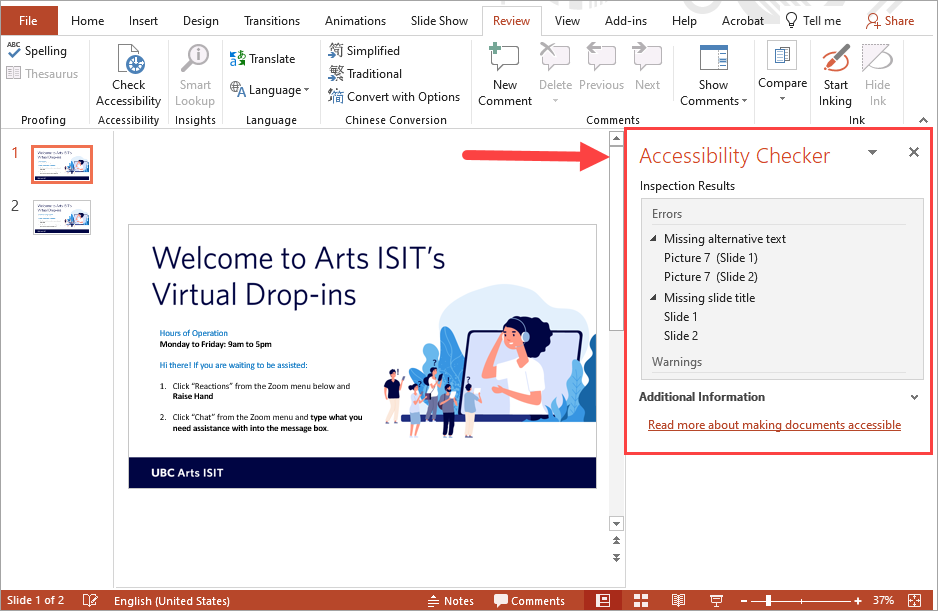
- A list of errors, warnings, and how-to-fix recommendations will appear in the pane on the right. See Rules for the Accessibility Checker for more information.
- Click on an issue to open the list locating the errors.
- To address accessibility errors and warnings, click the V icon beside the error location.
- Apply a fix by selecting an action from the recommended actions list.
- Refer to the Additional Information section for the recommendation rationale and the steps to fix the issue.

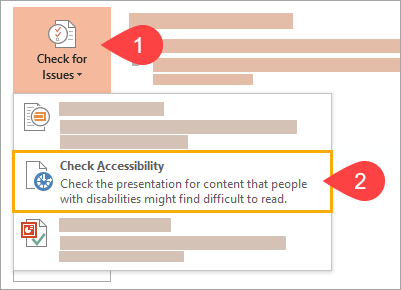
If the Check Accessibility button is not in the Review tab, you may be using an older version of the application. Please follow the instructions below to open the Accessibility Checker.
- Select File > Info.
- Select Check for Issues [1] > Check Accessibility [2].
- The Accessibility Checker sidebar will appear on the right with the inspection results and recommendations.
Colorblind Web Page Filter Test
The Toptal Colorblind Web Page Filter Test is a tool that allows you to test what your website looks like to people with different kinds of colorblindness.
To use this tool, enter the URL to your website, select a color filter, click "Fetch and Filter!" You will then see two versions of your website. On the left side, you will see how it looks without the filter and on the right side will show your website with the filter applied.