FormScanner
Create customized multiple-choice forms and grade them through a scanning application at no cost.
Open-sourced and free to use, FormScanner is a fast and updated alternative to Scantron grading products. Rather than using pre-made forms that require prior ordering and delivery time, users can create custom forms with the built-in test tools and print out their own forms.
After the scanning process, instructors can look through the student responses and customize how they want the questions to be graded. FormScanner offers intuitive analytic tools to produce reports of student answer distributions and overall class performance.
Equipment required
- Printer (check with your department for printing needs)
- Feed scanner
- Computer
- Software
Form templates and the equipment required, excluding a printer, are available at the Arts Learning Centre (BUCH C106).
Features
Formscanner offers features to customize forms and grading results.
- Completed forms can be scanned into the software using any scanner and personal device
- Form templates can be printed from any printer and personal device
- Forms can be customized using built-in tools
- Extensive test analysis options
- Multiple test version marking
- Grades can be transferred into Canvas via spreadsheets
- Grading process can be customized, such as allowing multiple responses for a single question
Arts ISIT Resources
Make the most out of Formscanner with Arts ISIT resources, which includes the necessary tools, form templates and guides to help you get started.
- FormScanner
- Ghostscript
- XnConvert
- Analysis Tool Excel file (download file from current website and upload to new)
Arts ISIT provides multiple-choice exam forms that instructors can administer to students for exams. These forms can then be scanned and processed with FormScanner to collect data for scores and student performance analyses.
Choose the form that best fits the number of questions on your exam. For example, if you have 50 or fewer questions choose the 50-question form, if you have 51 to 100 questions, choose the 100-question form, etc.
- Print exam forms straight from the electronic PDF document on the computer.
- Do not make copies from a printed facsimile exam sheet, as these can become incorrectly calibrated.
- Print 5-10 extra exam sheets to have on hand at the exam.
You can create your own template using the FormScanner application. This may be helpful if you would like a custom number of questions (rather than the templates Arts ISIT provides for 50 and 100 question exams). Before you start, make sure you have a form ready to use as a template. It can be blank or filled out, but it must be a JPG file.
There are two parts to creating a template from scratch: specifying the range of possible answers on the exam, and specifying the range of possible answers for the student number.
Exam Answer
Please make sure that you have first made the exam answer portion before moving on to the student number. For example, Group001 would refer to the exam answer portion and Group002 would refer to the student number portion.
This order is important as it affects how FormScanner scans student responses and its compatibility with the analysis tool. In the CSV output file, student numbers should appear after student responses.
- Go to Template > Create Template from Image
- Locate a JPG file of any form, and click Open
- In the pop-up, click the large plus symbol (+) in the top right corner
- Under the Field type tab, ensure the type is set to Questions by rows then click confirm
- Fill out the Field properties section according to your test parameters.
- Click Confirm
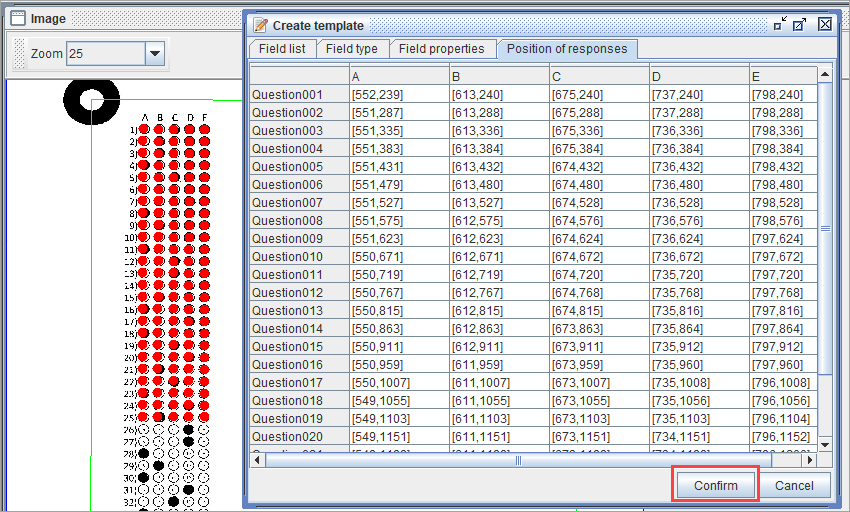
- When the image of the form appears, click on the bubble for A1
- Next, click the bubble for option E of the last question of your exam (ex. E25)
This will prompt a pop-up with the coordinates of all possible responses for this 25-question quiz with 5 multiple choice options. - Click Confirm

Student Number
- Before saving this template, click the large plus symbol in the top right corner once more, to create the template for the student number response.
- In the Field type tab, ensure the type is set to Questions by rows, and click Confirm.
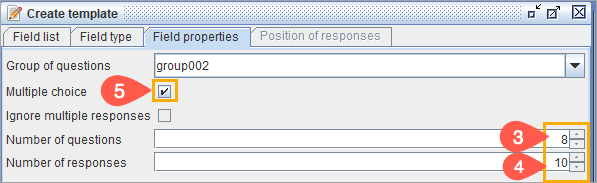
- Set the number of questions as 8 (student numbers are 8 digits).
- Set the number of responses as 10 (there is a maximum of 10 integers in a student number).
- Check Multiple choice.
- Click Confirm.
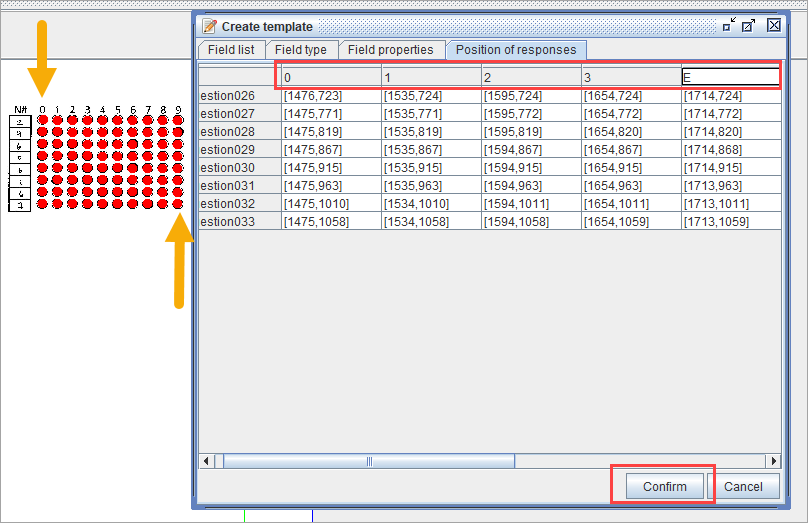
- Set the coordinates for the student number response by clicking the top left bubble and the bottom right bubble.
- In the pop-up, double-click on the value A in the top row. Replace this with the number 0.
- Repeat this step with B becoming 1, C becoming 2 etc. Until you have replaced the letters A through H with integers 0 through 9.
- Click Confirm.
- Click Save template and save to a location on your computer.
To ensure a smoother experience with running FormScanner, consider the following best practices before distributing the exams to students.
- If using multiple exam versions, mark them in advance as Exam A, B, C, etc
- Review the following guidelines with students before the exam begins:
- Use a dark writing tool to fill in the form bubbles
- Ensure each answer bubble is thoroughly filled in and sufficient pressure is applied with the writing tool
- Avoid altering the form (ripping, tearing, etc.)
- Do not write on the form outside of the bubbles and information areas
Once the exam forms have been filled out, they can be scanned as individual images that FormScanner will use to collect data about student responses.
- You will need to use a scanner (ex: the scanner in BUCH C105A). Please note that the quality of the scanned documents can be grainy. Do not use an all-in-one or multifunction printer to scan the forms, as these devices can cause alignment issues.
- Place a stack of exams into the printer’s top hopper, and adjust the paper size sliders so they touch the touch the edges of the paper.
- Scan all forms in the same orientation.
- Limit scanning to 30 forms at a time to limit mistakes when scanning.
- Each forms should be scanned as an individual JPEG image.
- The forms must be scanned with a resolution of 300 dots per inch (dpi) and JPEG file output. If the proper settings are not in place on the BUCH C105A scanner, please let one of our staff know.
- If the scanned documents are too light, lowering the threshold for black and white can darken the gray/black areas on the documents. Please note that this feature may not be available on all scanners.
- The forms should be scanned to Black and White to minimize errors when processing.
- The images should be moved to a designated folder upon scanning.
Running FormScanner to collect student response data consists of two parts: loading the template, and loading the images of students’ exam forms. Please download the FormScanner application.
Loading a Template
- Click the Template tab
- Click Load Saved Template
- Locate the appropriate template file, and click Open
Loading Student Exam Forms
- Click the blue Files icon
- Select the image files of your students’ test forms. To select multiple files, hold down the Ctrl button while selecting the files.
- Click Open
- Click the blue Play button
- As prompted by the pop-up, Save the scan results.
Once the response data has been collected, use the FormScanner Analysis Tool to compile the information into a CSV file. The CSV file can be read easily and/or uploaded to the Canvas gradebook.
Scanning results into the FormScanner Analysis Tool
- Download the FormScanner analysis tool.
- Open the FormScanner Analysis tool.
- Click Enable Editing if you are prompted with a ‘protected view’ message at the top of the page
- Click Enable Content if you are prompted with a ’Security Warning: Marcos have been disabled” message
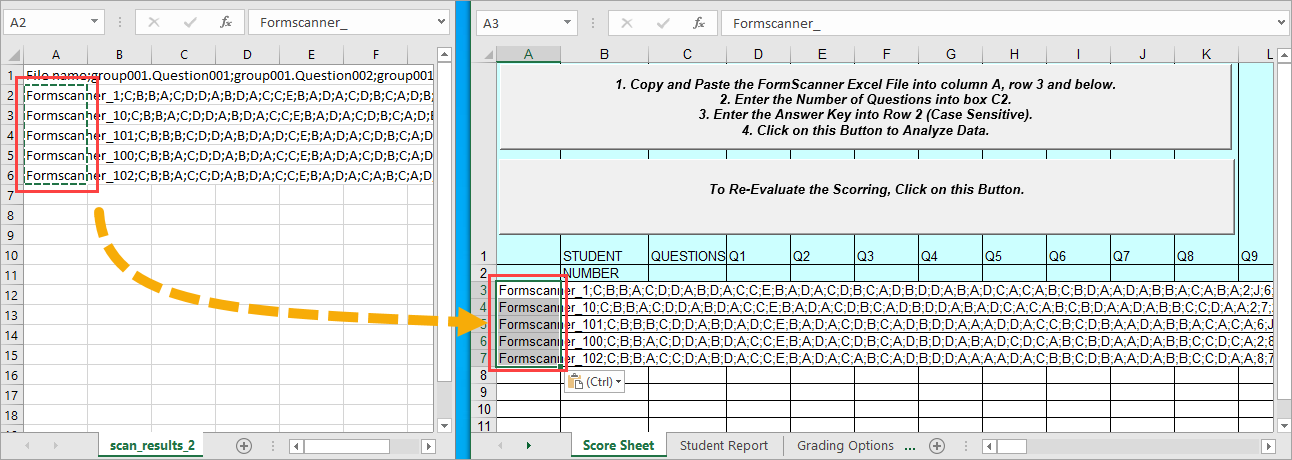
- In the Scan Results CSV file, copy the values in Column A, starting from A2
- Paste this into Cell A3 of the FormScanner Analysis Tool
- Enter the number of questions on the exam into cell C2
- Fill in the correct answers along Row 2, starting with D2. Ensure these letters are upper case.
- Click the large grey button at the top of the Excel sheet.
The student numbers will populate in column B, and all the responses will be organized and graded.
Use the Analysis Tool Score Sheet
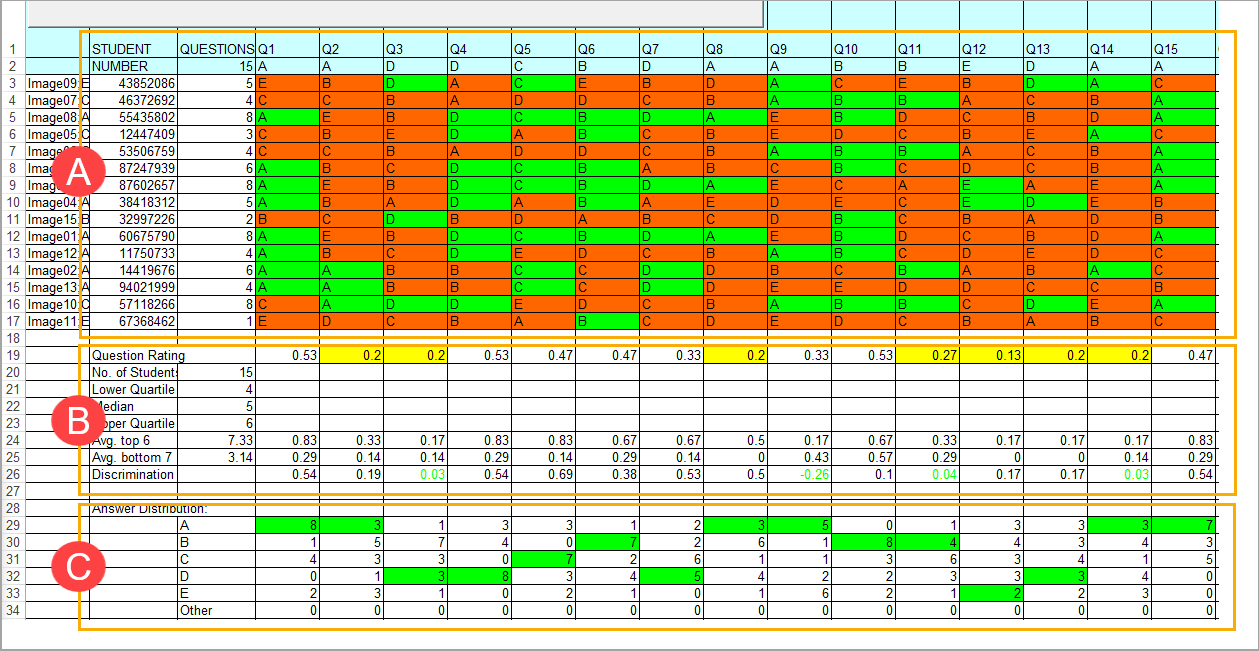
- View all student responses organized by student numbers. Those in green indicate a correct answer, those in orange indicate that the student made a mistake. You can also find the total score for each student under the “Questions” column.
- View descriptive statistics (e.g., lower/upper quartiles, median) for the entire assessment. Any questions that were poorly scored (I.e. < 0.3 question rating; less than 30% of the class received marks) will be highlighted.
- View how the answers are distributed for each question. The numbers highlighted in green correspond to the correct answer.
The student report sheet helps you organize and match the scores with the corresponding student name and student number, allowing an easy transfer of grades into the Canvas gradebook. Transferring without a CSV file will be more time-consuming, as you will need to manually match the student numbers to the students’ names.
To get started, please export the grades as a .csv file in the gradebook on Canvas. Check out the Canvas community guide if you are unsure how to do this. You will notice that students’ first and last names are combined. For the analysis tool to match scores to names properly, you will need to separate these names into 2 different columns – Last name, First name.
- Insert a new column next to the student names.
- Highlight all the cells where student names exist.
- Click the Data tab.
- Select Text to Column.
- A new window will open. Select Delimited > Next
- Select Comma > Finish
- The student names will now be separated into two respective columns (Last name, First name). Copy the student names and their student numbers (listed as “SIS User ID” in the gradebook .csv file) into the analysis tool.
- Click the left button to match student numbers with the scores in the Score Sheet
- Export a new version of your Canvas gradebook. Copy and paste the final scores from the Analysis Tool Excel sheet into the new Canvas gradebook export. This new gradebook .csv file can then be imported back into Canvas
Consultations
If you would like further support on Formscanner, please connect with us to learn more about the tool and its capabilities.