We want your online exam support experience to be as easy and stress-free as possible. Below is some helpful advice on how to troubleshoot the most likely technical difficulties and how to get help when you cannot resolve the issues on your own. We recommend that you print or otherwise have the information on this page handy before beginning the exam in case any issues arise.
Note: This document is general advice for all Arts’ online exams. It does not set policies for how particular courses should handle exam issues.
Respondus Lockdown Browser FAQ
If this is a timed quiz, please track the amount of time spent on troubleshooting technical problems so that the student's exam time can be extended as necessary. The on-site support person should do the following for the student(s) to exit Lockdown Browser:
- Click on the globe/ ⓘ icon.
- Click Proctor Exit in the pop-up window.
- Enter the proctor exit password (can be found in the LDB tab settings) (case-sensitive) > click OK. This will shut down Lockdown Browser.
- Relaunch Lockdown Browser and log into Canvas.
- Navigate to the quiz and click Resume Quiz. Any answers that were previously answered should be saved.
If the exam is completely remote, the instructor needs to decide whether to give the proctor exit password to the student(s) so they can complete the steps above. Otherwise, the student(s) should hard-restart their computer by holding the on/off button for 5 seconds and turning the device on again.
If only individual students are encountering the issue:
- Ensure the latest version of Respondus Lockdown Browser is installed on the student's computer.
- Ensure any VPNs running are turned off.
- If students need to exit Lockdown Browser to do the steps above, please see the instructions provided in the item above.
If most or all students are encountering the issue, the instructor or TA(s) needs to check for the following in the Canvas course:
- Go to Files from the course menu.
- Ensure the quiz image files, as well as the folders they are located in, are published.
- Ensure the embedded images are located in the current Canvas course. If you are not sure how to fix the issue, please contact Arts ISIT for support.
- Ensure any VPNs running are turned off.
- Ensure any open windows and applications on the computer are turned off.
- Ensure the student is clicking on the Lockdown Browser application (on the desktop for Windows, searching in the Launchpad for Macs).
If the student is still unable to launch Lockdown Browser after confirming the above steps, please direct them to ITSC for support.
Create a Zoom drop-in session and provide the details to students before the exam, so that they are able to contact you if they have questions or run into incidents.
If multiple students are experiencing issues using Lockdown Browser, but they were able to complete the Arts ISIT: Exam Practice Run with no issues before the exam, you may want to check your Canvas course to see if there is an "Error" showing up in the Lockdown Browser settings for the quiz.
- Go to LockDown Browser from the course menu.
- If there is a prompt indicated an error next to the quiz name, click Fix Error.


- If no error is indicated, please contact Arts ISIT for support.
Please ask the student(s) to follow the steps below:
- Take a screenshot or picture of the answers in case they are not saved.
- Proctor exit the LockDown Browser (see the first "A student lost connection to the internet / A student has a frozen screen" accordion).
- Disconnect from the wi-fi network for a minute, then reconnect.
- Come back to the exam to finish submitting.
If a big portion of the answers is lost, you might consider granting the student(s) additional attempts to rewrite the unsaved questions. Please follow the steps for "I would like to add additional attempts to an individual student" under Canvas FAQ.
- Go to LockDown Browser from the course menu.
- Click the down arrow icon in front of the quiz you are managing.
- Click Settings in the dropdown menu that appears.
- Check if there is an error message.
Unfortunately, this cannot be fixed after the quiz has started. For future exams, please ensure the Lockdown Browser settings are double-checked. Lockdown Browser has a "Fix" function that instructors can use to address any issues.
Please ask the student to try restarting the computer.
Please let the student try uninstalling, then reinstalling Lockdown Browser.
The student should be able to click Kill these applications to solve this problem. If this does not solve the problem, please ask the student to follow the steps below:
- Click the Apple menu (apple icon).
- Click System Preferences.
- Click Siri, then uncheck any selected apps listed under "Siri Suggestions & Privacy".


- Click Done.
- Click the Apple menu (apple icon).
- Click System Preferences.
- Click Siri, then uncheck "Enable Ask Siri".


- Uncheck "Show Siri in menu bar"
- Click the Apple menu (apple icon).
- Click System Preferences.
- Click Users & Groups, then select the user account (the student should select themselves).
- Click Login Items.
- Highlight any items and click the "-" symbol to remove them from automatically opening.


- Close down all other applications.
- Restart the Mac computer.
- Click Finder.
- Click Applications, then find and immediately launch Lockdown Browser. Do not start any other app or search for anything else in the Finder.
- If a prompt appears that says "Siriknowledged" follow the instructions here: https://support.respondus.com/hc/en-us/articles/4409595654171-Siri-detected-as-running-on-Mac
Sometimes, this occurs when there are numerous Blacklisted Applications running. To work around this, please ask the student to keep clicking Quit Lockdown Browser repeatedly, until the window closes.
Please ask the student to completely uninstall the Chrome Remote Desktop plug-in for Lockdown Browser. Please note that clicking Kill all applications will not work.
Please ask the student to follow the steps below:
- Open Task Manager (Windows) or Activity Monitor (Mac).
- End any Respondus Lockdown Browser processes.
- Relaunch Lockdown Browser.
- Go to LockDown Browser in the Canvas course navigation.
- Click the downward arrow icon in front of of the quiz you are managing.
- Click Settings in the dropdown menu that occurs.
- Click Advanced Settings.
- Click Allow students to take this exam with an iPad (using the "LockDown Browser" app from the Apple App Store).
- Click Save + Close.
Please let the student try uninstalling, then reinstalling Lockdown Browser.
Canvas FAQ
To avoid any issues during the exam, here are some pre-emptive measures you can take:
- If you have a large class (more than 200 students), split the class into groups of about 100 students and stagger their start times by a few minutes to avoid overloading Canvas. Instructors can contact Arts ISIT Learning Centre to make a request in staggering the start times of the Canvas quiz.
- Ask students to ensure that all other applications and tabs are closed, to maximize the functionality of Canvas.
- Ask students to ensure that their browser is up to date. They can use this website: www.whatismybrowser.com/ to see if their browser version is updated. We recommend that students use Chrome, as it is the most reliable browser for Canvas.
Only the instructor or the TAs can do the following steps:
- Find and click the quiz that the students are writing.
- Click Edit at the top right corner.
- Change the Available Until date for the student, so it covers their extended exam time.


- Save the change.
- Click Moderate this Quiz (located in the top right corner of the quiz page).


- Search for the student's name in the search bar.
- Click the blue clock icon next to the running time.

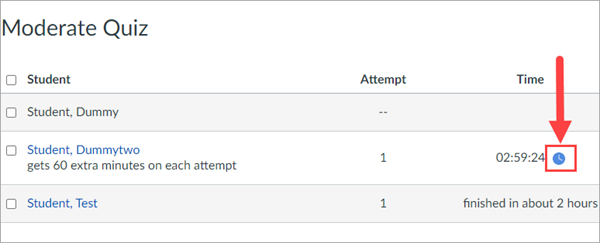
- In the pop-up window, enter the number of minutes you would like to add to the student's current attempt.
- Remove "now" from the dropdown menu and select Current End Time to extend the time on the current attempt.
- Click Extend Time to save changes. The student's countdown clock in the exam will be automatically updated.


This is a known bug. In most cases, the student's answers should still be saving. If students report this issue, please ask the students to continue doing the quiz, but check the student's quiz logs to confirm that their progress is being logged. If a student is continually seeing "Saving..." at the bottom of the quiz, please ask the student to check their internet connection.
If a relatively big portion of the student's exam answers failed to save due to technical issues, you might consider granting the student another attempt to rewrite the unsaved questions, as Canvas cannot re-open a submitted quiz attempt:
- In your Canvas course, navigate to the quiz that the students are writing.
- Click Moderate this Quiz (located in the top right corner of the quiz page).


- Search for the student's name in the search bar.
- Click the pencil icon on the right side of the screen.

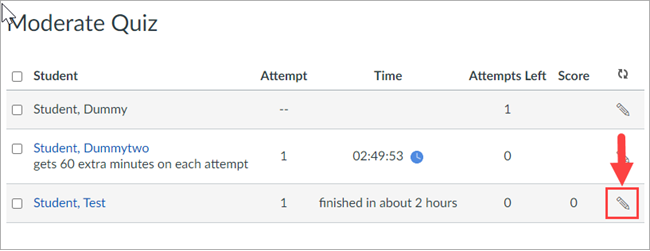
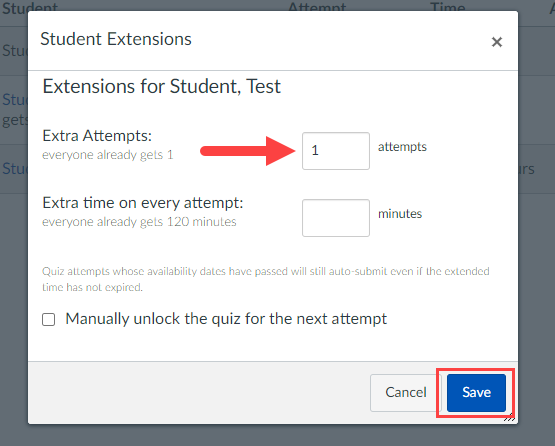
- In the pop-up window, enter the number of extra attempts that you would like to grant the student in the "Extra Attempts" field.
- Click Save.

Please ask the student to follow the steps below:
- Log into Canvas.
- Navigate to the quiz and click Resume Quiz. Any answers that were previously answered should be saved.
This is a known bug in New Quizzes. To work around this, you can give the student an additional attempt for the student after they finish the current attempt, and manually submit their second attempt when the extra time runs out. For example, if you intended to extend the student's exam time by 10 minutes, then you will need to manually end the student's progress after 10 minutes into the second attempt.
- Ask the student to continue the current attempt until time runs out.
- Navigate to the quiz in Canvas.
- Change the "Available Until" date for the student, so it covers their extended exam time.
- Save the change.


- Go back to the quiz page in Canvas and click the Build button at the bottom.
- Click the Moderate tab.
- To the right of the student's quiz information, click the Moderate button.

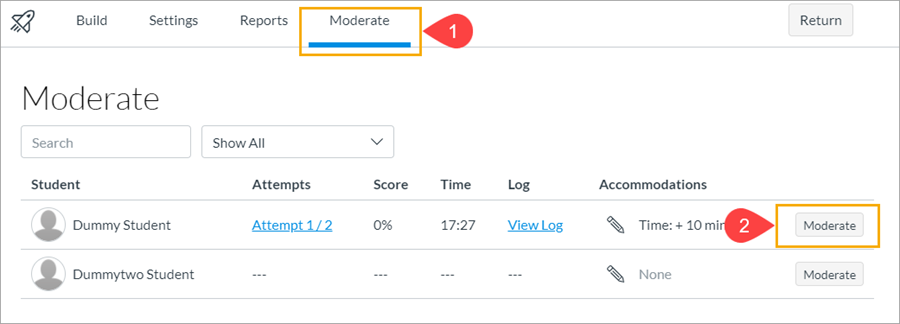
- Enter the number of additional attempts to give the student another attempt.


- Ask the student to take the quiz again when their current attempt ends.
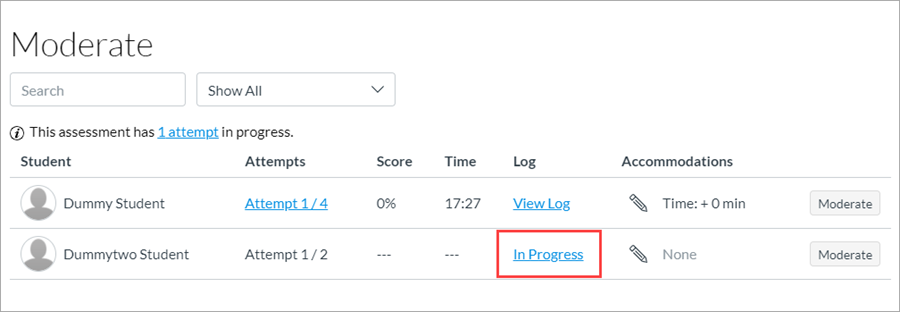
- After the extra time passes, in the Moderate tab (step 6), click In Progress in the Log column for the student.

- Click Submit This Attempt
.
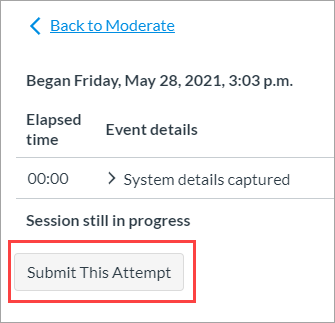
- Confirm by clicking Submit in the pop-up window.
Zoom FAQ
Student communication to Instructor/TAs
- Chat within Zoom - Zoom allows students to send chat messages to co-hosts or the host, even if the private chats are disabled.
- Email - For the student experiencing issues getting into the Zoom meeting, TAs and instructors should monitor their own incoming emails.
Instructor/TAs communication to students
- It is recommended to create a breakout room so students can be moved to the breakout room to communicate with the instructor/TA without disturbing the other students taking the exam in Zoom.
Instructor/TA communication to others Instructor/TAs in breakout rooms
- Click the Breakout Room button at the bottom of the Zoom meeting.
- Hover over the breakout room where the instructor/TA you want to communicate with is in.
- Click Join on the right side.


- You can now send private messages to the instructor/TA in Chat. Select the name of the instructor/TA from the "To:" dropdown menu.

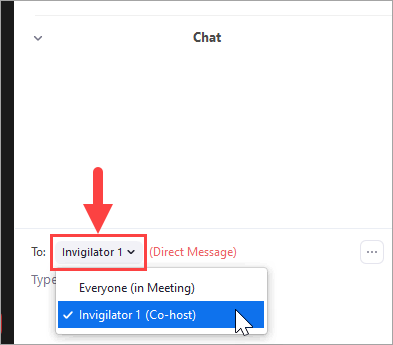
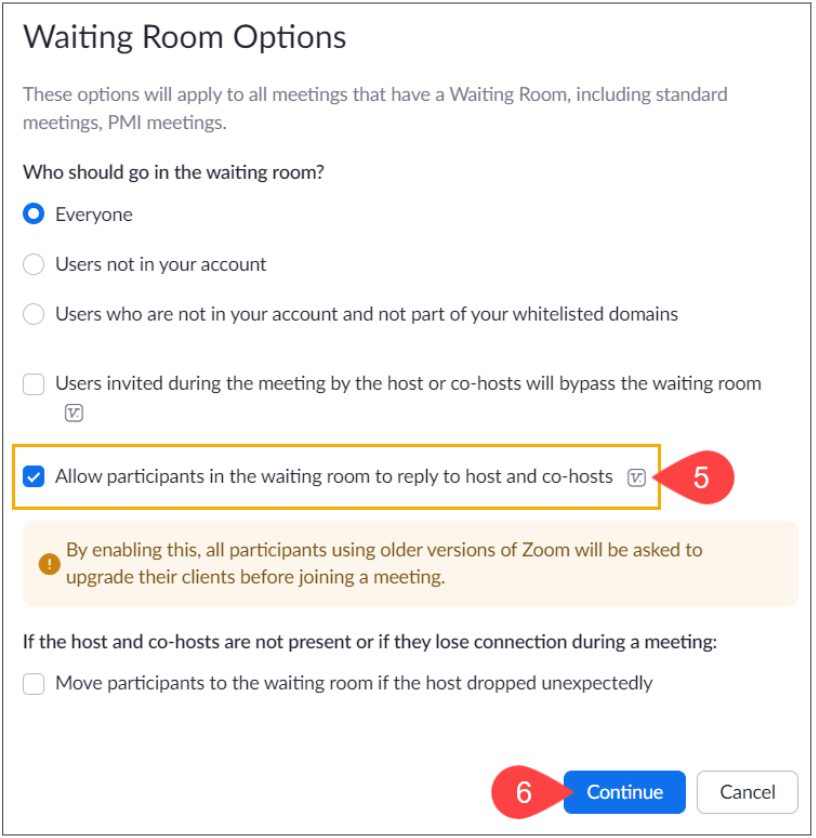
Two-way chat is now available in the Waiting Room. Hosts can choose to send messages to everyone or specific students within the meeting room, and students can also reply to the host and co-hosts. This can be very helpful if the host wanted to provide any important updates before the exam starts. Note – Everyone in the meeting (I.e., Hosts, cohosts, students) will need to have Zoom in version 5.8.0 or later. It is recommended that everyone updates their Zoom prior to the exam. See the instructions below to enable the waiting room in your meeting.
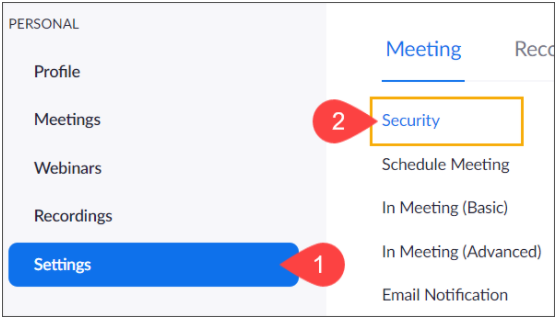
- Sign in to zoom.us and navigate to Settings
- On the left side menu, click Security

- Switch on the toggle beside Waiting Room
- Click Edit Options


- Check Allow participants in the waiting room to reply to host and co-hosts.
- Click Continue

On the account level, once the "Focus Mode" setting is enabled, you will be able to schedule meetings to begin with "Focus mode" automatically turned on. “Focus Mode” allows the host and co-host(s) to view all the participants’ videos and shared screens, without participants being able to see each other. During Zoom exam invigilation, Focus Mode may be used so that a student may show their student ID card to the instructor without displaying their information to the rest of the class. See the instructions below to set up Focus Mode in your meeting:
- Sign in to https://zoom.us/ and navigate to Settings.
- On the left side menu, click In Meeting (Advanced).


- Switch on the toggle beside Focus Mode.
- In the Zoom meeting, click More > Start Focus Mode.


If you are holding an invigilation session or an exam over Zoom, it is important to disable private messaging between students to avoid academic misconduct. See the instructions below to turn off private messaging:
- Sign in to https://zoom.us/ and navigate to Settings.
- On the left side menu, click In Meeting (Basic).
- Scroll down to the Chat settings, and change the dropdown to Host and co-hosts. It is recommended that your students still be able to private message the instructor and TA.
- Click Save.


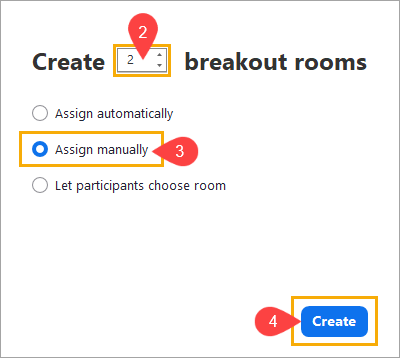
If you are invigilating a remote test, Breakout Rooms allow for a large group to be split into more manageable sizes so that each invigilator can be responsible for monitoring specific students’ video streams. Alternatively, a Breakout Room or two can be set up for the purpose of answering student questions privately. See the instructions below to open Breakout Rooms during your meeting:
- In the bottom toolbar, click Breakout Rooms.


- Select the number of rooms you would like to create.
- Choose the method you would like participants to be assigned to rooms. If you want to manually bring them to a room (in the case of answering questions), pick Assign Manually. If you would like everyone to immediately be split evenly between the groups (in the case of invigilating groups), pick Assign Automatically.
- Click Save.

General Internet and Browser Troubleshooting
If a student is experiencing Wi-Fi connectivity issues during an exam, they should try the following:
- Forget the UBC Secure network, and log back into it.
- Run a troubleshoot diagnostic. This can be done on Windows by right-clicking the Wi-Fi icon and selecting “Troubleshoot problems”. On a Mac, search “Wireless Diagnostic” on spotlight and click “Monitor my wi-fi connection”, then select “Continue”.
- Restart the device.

